

Note: When you click on the affiliate link in our article to purchase the product, we will earn some commission.
In this post, we chose to share a far reaching guide on the best way to make slideshows with Slider Revolution, the underlying advances and setup, just as many tips and deceives that work best with this awesome module.
Web design includes a myriad of instances that entangles some important website aspects, starting from a visitor’s first impression to user experience. Sliders in web design are ubiquitous and somehow controversial, yet they spice up the design like nothing else.
WordPress’ core management comprises of themes and plugins, each holding their share of design and functionality. The no-code proclamation that WordPress proudly shares is made easy with plugins like Slider Revolution that gives you the lifetime opportunity to build and design sliders like a pro.
Considering Slider Revolution as the ultimate slider creation, with all the plethora hyper-advanced features that includes under its belt, we’d say the epitome is well deserved. Add slides, layers, animations, and make your sliders responsive ready so that they stun mobile users as well.
For this article, we decided to share a comprehensive guide on how to create slides with Slider Revolution, the first steps and configurations, as well as a lot of tips and tricks that work best with this wondrous plugin. Stick around.
Lastly, Slider Revolution is a premium, You can click here to purchase.
How to Install and Active Slider Revolution
We already mentioned that the Slider Revolution is a plugin that comes bundled with the majority of our themes free of charge, ready to be implemented with your outstanding slides. For this section, we will develop how you can install and activate the plugin bundled with our themes, which in all frankly is super easy, and the second approach is going to show you how to install the plugin after the purchase.
How to Install Slider Revolution with Neuron Themes
With the installation of any of our Neuron Themes that come bundled with the Slider Revolution plugin, installing it is a breeze. At the utmost scenario, all our themes, will be installed via the wizard, which makes it easy to install all the bundled plugins as well as the theme. It is literally a few clicks away.
Check the Slider Revolution box for the wizard to install all your required and recommended plugins while you sit back and relax for a while. You should find the Slider Revolution plugin under WordPress Dashboard > Plugins > Installed Plugins.
To activate the plugin, you will need to locate the Slider Revolution plugin and click on the Activate link right under the plugin.
That should be it after you have installed the plugin, you should see it appear on the WordPress Dashboard and have access to start creating slides right out the bat.
How to install Slider Revolution – The paid version
If you have purchased the Slider Revolution plugin, then installing it will not require much work to do. First off, you will need to have downloaded the file onto your computer.
Once you have obtained the file, next you will need to go to the WordPress Dashboard > Plugins > Add New and click on the Upload plugin button at the top of the page.
Choose the file you downloaded from CodeCanyon and click on Install. Upon installation you should see the Slider Revolution plugin added on the left panel of the Admin panel in WordPress.
Taking the first steps with Slider Revolution
Installing the plugin was the simple part, now we shall give you a ride along some of the most crucial steps and settings you should know before you start working with Slider Revolution.
The smooth and modern interface that Slider Revolution displays, speaks for its self, but for all those starting fresh it can seem a little intimidating. Fear not, since this tutorial will give you all the valuable insights to get you started on your magic.
How to set the module’s layout and size for responsive breakpoint?
Responsiveness in a website has now become an essential component fr user experience as well as search engine optimization. With all the valuable traffic coming from mobiles, it will be a shame for your sliders to break when viewed on other devices.
In such case Slider Revolution has made sure to fix and set the responsive breakpoints for each slider, leaving you with exceptional looking designs that perform wonders on other devices as well.
To set how your site loads and renders on each device, go to WordPress Dashboard > Slider Revolution > General.
The General’s tab will contain a bountiful of settings you can configure, like choosing which WordPress role should have access to the plugin’s admin, or the options to load the plugin’s script on the footer’s section and much more. Leave these settings to their default values.
What you will need to tweak for responsive slides are the Default Layout Grid Breakpoints. Locate the section from where yo can set the breakpoint for each device.
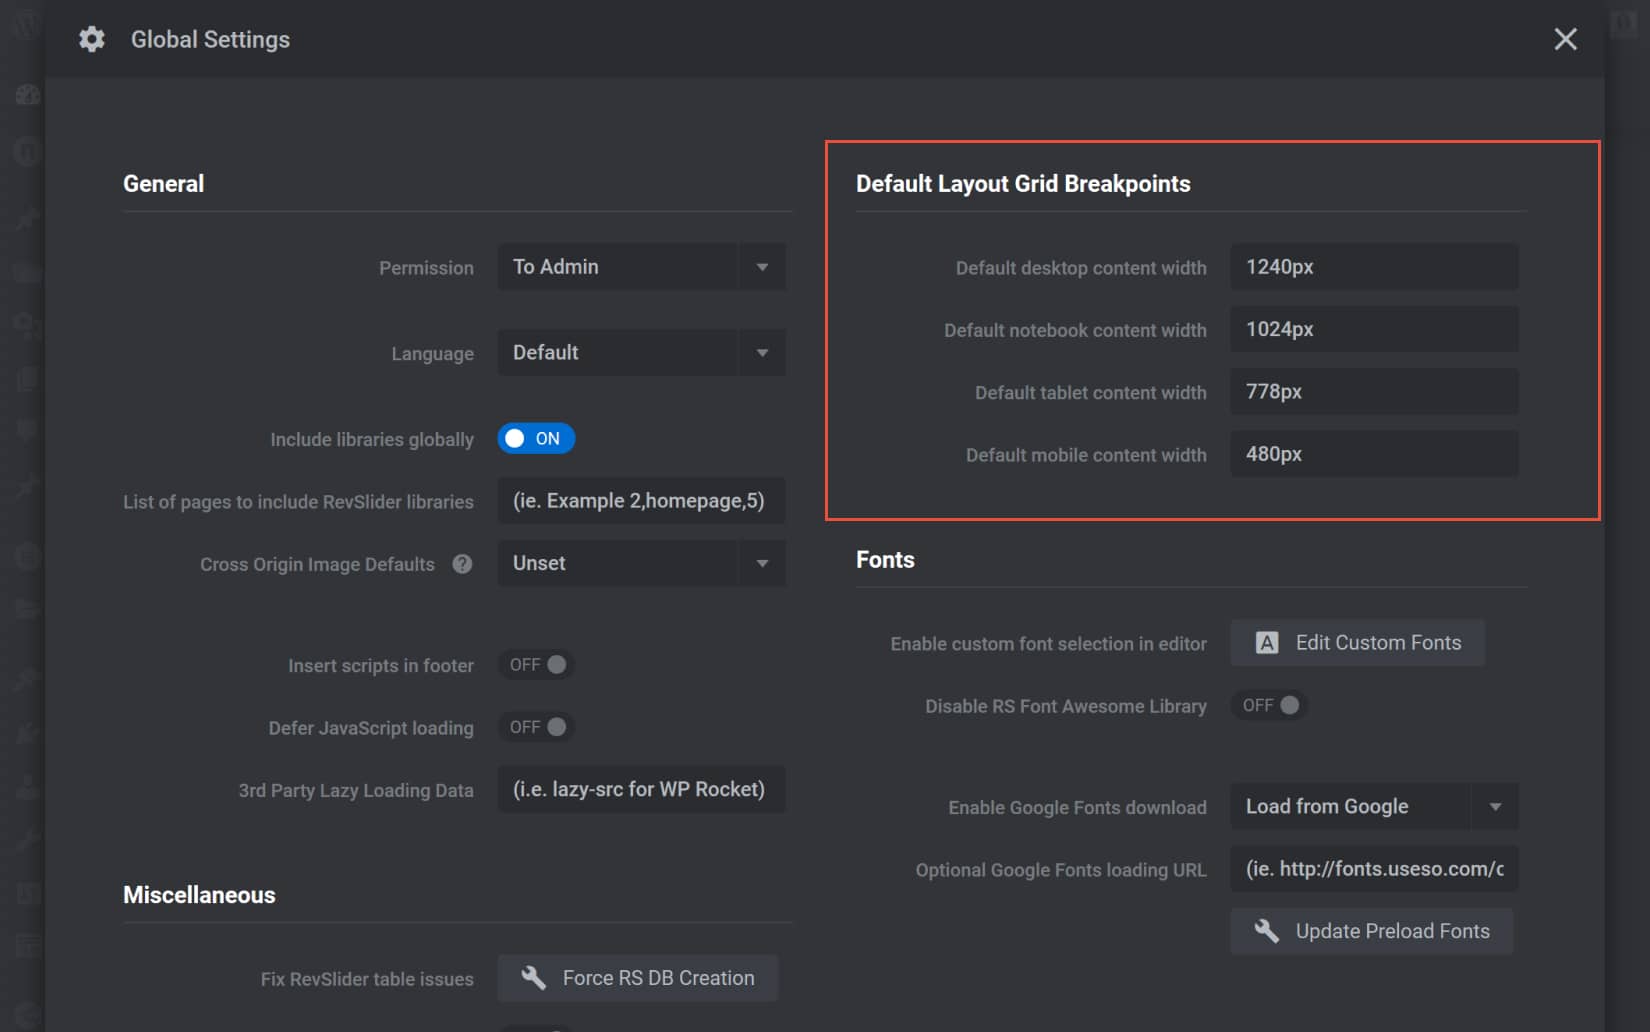
In web design, a breakpoint is a stage at which a website’s content and design will accustom in order to provide the best user experience. The default breakpoints are set by default. These are the general values that work for most users.
If you are working with minimum width, then these values should work just fine when you set the slider at full width, it will take up the entire screen even if you view your slides in a desktop larger than 1920 px.
Each device has a different size, responsive design is being aware of all aspects of how your website is going to be displayed.
BUY IT NOW!
How to Set up your First Slide with Slider Revolution?
Once you have configured the settings needed it is finally the time to set up your first slider. Slider Revolution offers a step by step tour guide by showing you the basic principles.
To start creating your first Slide with Slider Revolution click on the New Blank Module box.

The Notebook field will include all Notebook devices including laptops, MacBooks as well as horizontally oriented tablets. To make sure we have covered all devices included put the value of 1600px.
Next on, we have the tablet’s configuration settings, this includes all the vertically oriented devices, they present optimal vertical imagery of 778 pixels. This value is already set by default. But is, by all means, you want to include some devices that can horizontally rotate, then you should put the value of 1025. This should be all up to your preferences.
Lastly, but certainly, not least importantly the have the mobile configurations. Mobile devices will vary in size, in order to make sure you have included all mobile devices, we would recommend the values between 360 and 500 pixels width. The default setting of 480 px should work for most users.
After you have set these values and are confident these work for you don’t forget to click on the Save Global Settings button.
Once you click on the New Blank Module button you will be presented with a three choice option on what slider you want to build and design. Let’s break it down to all three of them.
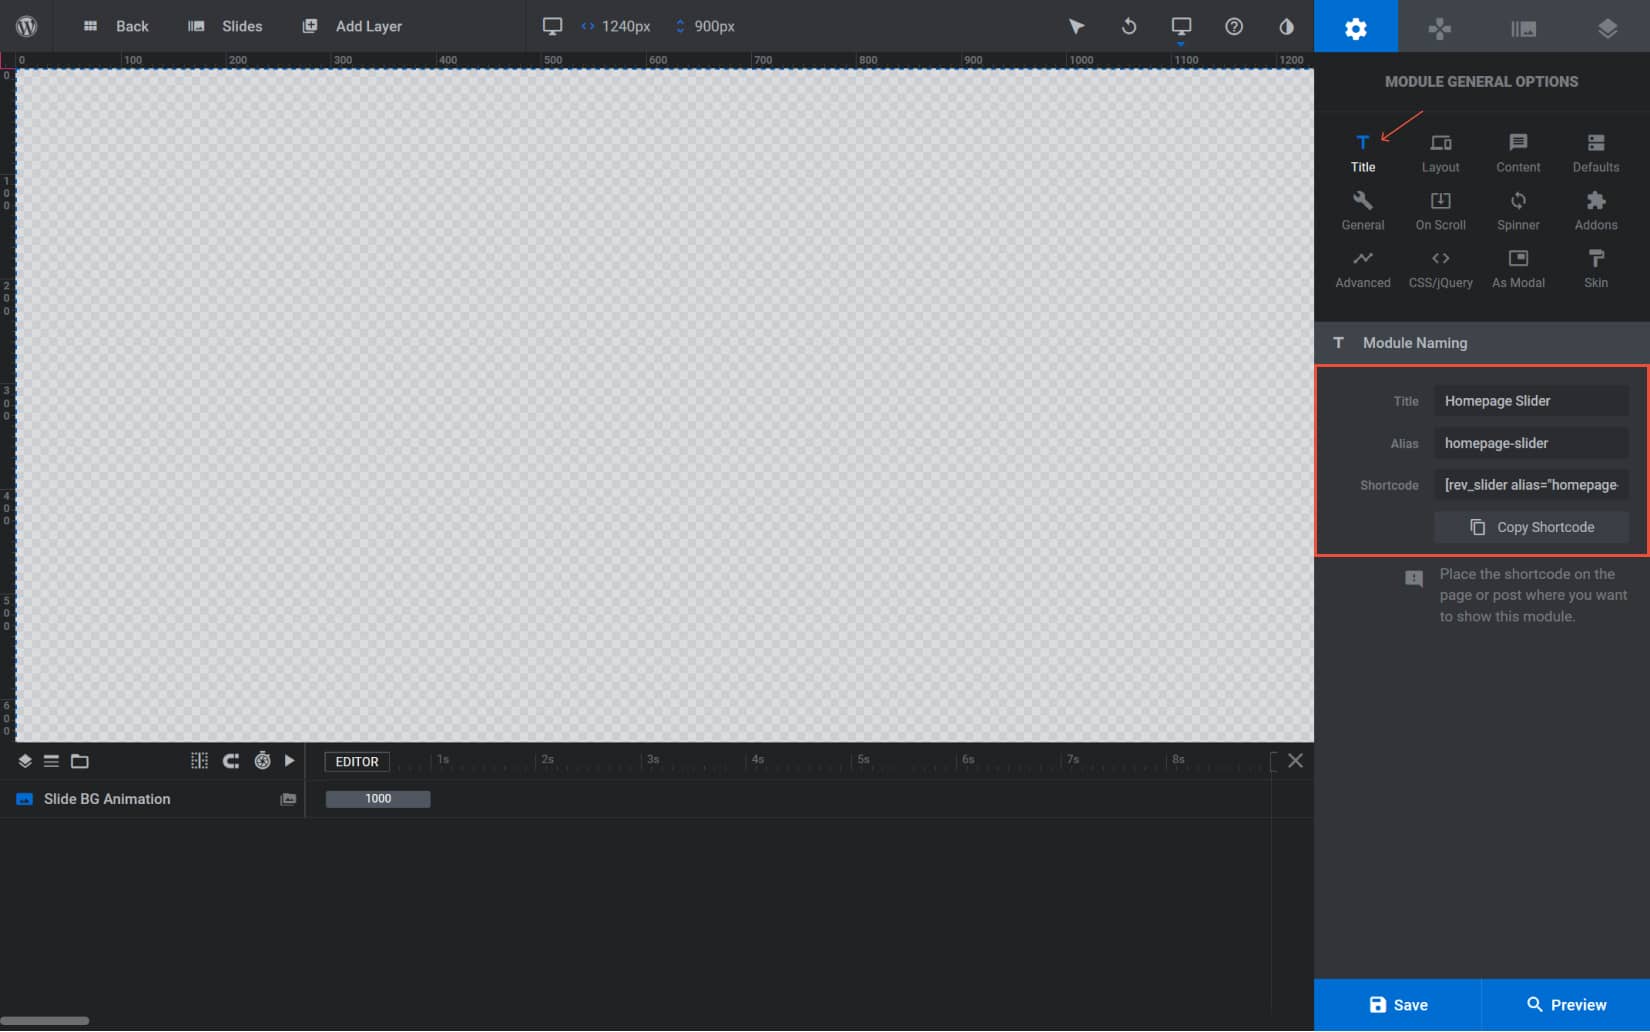
Before we dive into that, you should always name your sliders for better organization and helps you find each slider easier. To name your slider, under the Text module > Title type down the name of your slider. Under the Alias section, you can type in the name of your slider, only this time separate it with dashes in between. E.g. the title of our slider is going to be Homepage Slider, the alias for our slider should be homepage-slider.
Now let’s get down to business, the Slider Revolution allows you to build amazing and various slider types.
How to choose the right slider for your design?. This is simple when you know and define the types of sliders that Slider Revolution has in store. Under the Layout module first, you will need to determine the type of slider you are going to use.

First off you have Slider, this type will consist of multiple sliders each with their own content and display that you can easily navigate with the added navigation elements that it provides.
Next, you have the Scene type, this consists of a single slide and usually does not provide navigation elements, as there is no other content to guide along.
And lastly, you have the Carousel type which will consist of multiple sliders that can be visible at the same time.
The usual type to work with is the Slider type, but depending on your design and interests you an choose from either of them. They will all work wonderfully and can be added some cool animations, which we will cover in a later section.
How to set the size of your sliders with Slider Revolution?
The same importance as choosing the right type of the slider will be to set the right size for your slider. This entire process will greatly depend on the type of slider you want to create and the design you wish to style.
If you are going to create smaller slides that don’t take up the entire space screen then the Auto option will be the choice. On the other hand, if you are opting to create larger sliders, you should go with either Full Width or Full Screen. Again depending on the design, you wish to display.

Auto – When you set the slider to Auto size this mans the module dimensions will automatically adapt to the container’s width it is being placed in.

Full-Width – If you set your slider to Full Width this means the module will span across the full width of the page, while the height of the module will remain flexible.

Full-Screen – The Full-Width size means the slider will take he entire space of the screen in width and height.

Under the Layout Area Size, by default all other devices except Desktop will be disabled, to make your sliders responsive you should enable each of them by using the switching handle on. To make sure your sliders look superb on every device there are a few responsive design configurations.

By switching these settings on, the values will be generated from the general settings you set up earlier. Only here you will have the width and the height of the grid defined. Both the width and height should adapt when the breakpoint occurs. Once you are done click on Save for the changes to take place.
Other helpful settings from Slider Revolution
Besides the Layout module, under the General Options, you can configure other amazing modules that all include more in-depth and advanced settings. Let’s give you a review on each of them.

The Content Module – This module will allow you to choose how you want to add content to your slider. You will have a list of nine options available, although the default setting will be the one to work with. You can choose between the Post-Based or WooCommerce options as they can be handy.
The Defaults Module – Defaults Module will provide helpful and useful options, the most important being the duration of your slider, the default setting is set to 9000 milliseconds which is translated into 9 seconds, which is translated into a bad user experience. The duration is very long for an audience that has highly short attention spam. You could change this under Slide Duration, you can set a value between 3000 and 5000 ms.
BUY IT NOW!
The On Scroll Module – Here happens all the magic. Slider Revolution includes some outstanding scrolling effects that you can choose from either parallax, 3D depths, timeline, blur, grayscale, fade, and more. To create awe-inspiring sliders will require a task of exploring and learning around the effect’s settings. You can customize these effects based on their speed, direction, tilt, and much more.
The Spinner Module – This will serve as your preloader. You can select from several available preloaders to show for when the module is loading. You can set a slider background o you can turn it off completely.
The Addons Module – This module will give you access to Slider Revolution’s addons which can be unlocked if you purchase your license.
The Advanced Module – If you wish to enable the lazy loading this is the spot, this module will also allow you to set a fallback image or you can simplify your slider on old browsers.
The CSS/J Query Module – For when you are feeling a little experimental you can add your own custom code to your slider. Note that this will require some serious coding skills, if you lack those, then do not try this at home.
The As Modal Module – This module will allow you to display your slider as a popup or a lightbox, here you will find all the respective settings to set its position, cover color, including the shortcode you will need to paste it onto the page you want to be displayed. This shortcode will differ from the main slider shortcode since it will also show usage attributes.
The Skin Module – This module will allow you to set the skin of your slider text, you can create custom Color Skin Templates that you can reuse it across the text on your sliders.
How to Display Sliders on a Page?
Now that you are done with all the nitty-gritty part of the slider creation and design it is time for your slider to be displayed live on your page. This is fairly easy, all you need to do is copy the shortcode and paste it on the backend, wherever you want your slider to appear.

The shortcode of the slider you create will be found on the Title module under the Alias section. Copy the shortcode and you should head back to the backend of your page to paste it. Place the shortcode into the main content section of the page you want your slider to appear.
How to Display Slider with Elementor
The shortcode method is pretty simple and straightforward, nevertheless, we have made it a mission to simplify every process of yours, thus this step we are going to show you will save your life.
Now you can display the sliders you create with Slider Revolution using the Elementor widget, simply dragging and dropping onto the working sheet. Choose the page you want the slider to be displayed on, go and edit the page with Elementor.
Next on, from the widgets panel search for the Slider Revolution 6 widget and drag it onto the page. Once you drag the widget you will be presented with a window asking you to choose the slider you want to incorporate

You can as well use the shortcode of the slider and will gain easy access to select the sliders you want to choose, edit them, or optimize the slider’s size.
Adding Layers to your Sliders
Step by step we are upgrading to more advanced options and settings, the beauty of Slider Revolution is that you can create the most complex sliders and give your users a run of your show.
You can add layers on your slider to make it more engaging, click on Add Layer at the top of the screen, and you will be presented with a dropdown menu containing all the layers you can add. There are 8 options available.
You can add Text, Images, Buttons, Shapes, Video, Audio, Icon/SVG, Row, Group, Layer Library available only with a license, and Import Layer.
Each layer will have its settings that can be easily customized and configured. You can style the layers, set the spacing settings, add animations to them, or play around with other advanced settings to build just about anything.
Final Thoughts
This concludes our comprehensive guide on how to use the Slider Revolution to create round breaking sliders for your website. There is much more you can create with this wondrous plugin as they offer a plethora of features and possibilities. All it takes is a little patience and exploring.
The steps we presented are only the basic settings you need to know to get you up and running with Slider Revolution, as you grow with the plugin, you find out what works and what doesn’t for you. Get creative and use the amazing features of the Slider Revolution to your advantage.
However, there is no free version of Slider Revolution, so if you don’t want to spend money for now and want to use a free slider plugin, SmartSlider3 from Nextend is a good choice. Click here to go to the SmartSlider3 website.

/the-mackeeper-scam-featured-256c7080a51d4d2493c482dac09b940e.jpg "MACKEEPER REVIEW 2021")
